How to Tie a Knot on a Maxi Dress
how to tie a tie Top Best types of Necktie knots
![]()
In this article, you will learn how to tie a tie. A tie that is knotted perfectly can make your day and It may help you in a job interview or maybe in a presentation. I know many persons in my friend circle that do not know how to tie a tie. Therefore, they always need to take the help of their friends or family members to make a perfect knot. After research on popular tie knots so, I am out with these eight types of tie knots you need to learn to save yourself from embarrassment.
Eve r y guy should need to learn this kind of regular stuff because A tie with a perfect knot will increase your personality and people will perceive you as a gentleman. Making a perfect tie knot may be a headache for some of the peoples. But do not worry about that, we have made a brief article on how to tie a tie. Follow these tips to master the art of how to tie a tie easy.
Learn how to tie a tie in simple steps:-
1. Full Windsor Knot
Full Windsor knot is a polished triangular shape tie knot and offers a good option for job interviews, presentations and social occasions. Because of its wide appearance, this knot looks best with a selection collar shirt. Although it's going to appear complicated, tying the complete Windsor knot is accomplished without much difficulty.
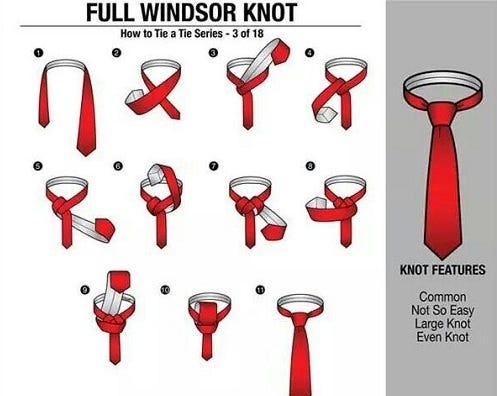
1. To start tying the complete Windsor knot, raise the shirt collar and drape the tie around the neck, therefore the wide end is on the proper side and extends about 12 inches below the narrow end.
2. Cross the wide part of the tie over the narrow part.
3. Pull the wide find yourself through the opening at the neck, then down.
4. Pass the wide end underneath and to the right of the narrow part with the wrong side facing out.
5. Cross the wide part over and to the left of the narrow part with the correct side facing out.
6. Pull the wide end up through the opening at the neck.
7. When bringing it down, pass it through the loop at the front.
8. Holding the dangling parts with one hand, slide the knot carefully up toward the collar with the opposite hand until snug, then lower the collar.
2. Half Windsor Knot
The half-Windsor knot, also referred to as the only Windsor knot , maybe a way of tying a necktie which produces a neat, triangular knot. It is larger than the four-in-hand knot and Pratt knot, but smaller than the Windsor knot . As with the complete Windsor knot , begin the method by raising the shirt collar. Drape the tie around the neck therefore the wide end is on the proper and extends roughly 12 inches below the narrow end.
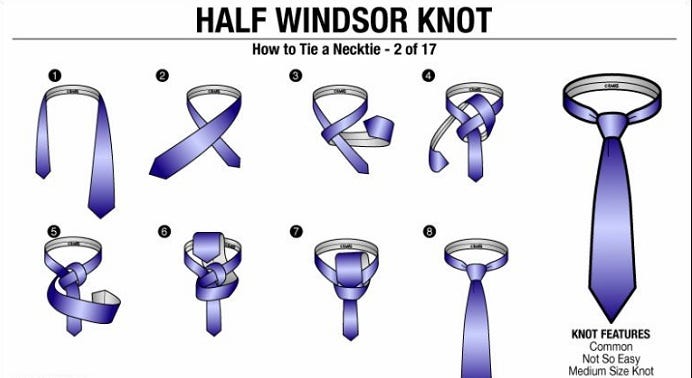
1. Cross the wide part over the narrow part.
2. Cross the wide part behind the narrow part so the wrong side is facing out.
3. Bring the wide find yourself and over to the left.
4. Pull it through the opening at the neck so it lays the wrong side out to the right.
5. Bring the wide end over the narrow part from right to left with the correct side facing up.
6. Bring the wide find yourself through the neck loop again.
7. When bringing it down, insert it through the loop at the front of the collar.
8. Adjust the knot by sliding it upward with one hand and holding the tails with the opposite .
9. Lower the shirt collar to finish the design .
3. Four-in-Hand Knot
The four-in-hand knot may be a method of tying a necktie. It is also referred to as an easy knot or schoolboy knot, thanks to its simplicity and elegance. four-in-hand knot works well for wide neckties in heavy fabrics. Few steps are necessary to tie a four-in-hand knot.
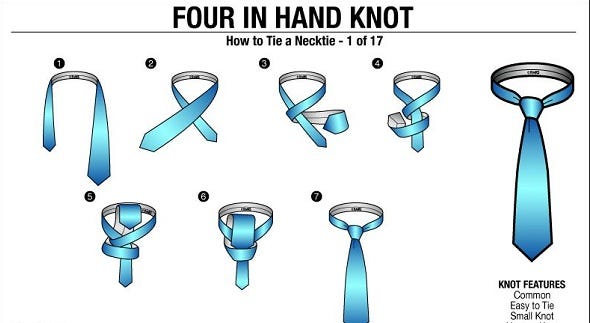
1. Raise the shirt collar and drape the tie around the neck so the wide end is on the right side and extends roughly 12 inches below the narrow end.
2. Bring the wide part of the tie across the narrow part.
3. Then bring the wide part under the narrow part.
4. Bring the wide side back over the highest of the narrow part.
5. Bring the wide side up through the massive loop at the neck.
6. With a loose hold on the knot, insert the wide end during a downward direction through the loop ahead .
7. Holding rock bottom narrow a part of the tie with one hand, slide the knot upward with the opposite until neat and comfortable. Lower the shirt collar to complete the look.
4. Nicky knot
Simply put, the Nicky knot maybe a Four in hand or a Victoria knot on steroids. It's simply bigger but slightly asymmetrical unlike the Windsor or Half Windsor knot. The name springs from Nicky, a Middle Eastern tie maker. Invented by their salesman Ernesto Curami who came up with this knot
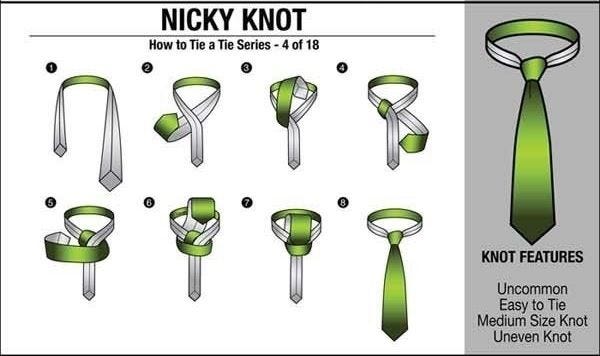
1. Drape the necktie around your collar with the seam outward and the thick end on your left, about two inches lower than you want the finished position.
2. Cross the thick end underneath the skinny end, making an X-shape below your chin.
3. Flip the thick find yourself ahead of the loop around your collar, then tuck it down through the loop, emerging to the left of the skinny end.
4. Bring the tip of the thick end horizontally across the front of the knot. Slip a finger underneath the horizontal band you???ve just created across the front of the knot.
5. Bring the tip of the thick to find yourself and underneath the loop around your collar.
6. Tuck the tip of the thick end down through the horizontal loop you created in Step 4.
7 . Pull the thick end all the way through the horizontal loop and comfortable it down.
8. Adjust the knot as required by holding it with one hand and pulling on the narrow end of the tie with the opposite .
Read More At https://learnmensfashion.com/how-to-tie-a-tie-best-ways-to-tie-a-tie-easy/
How to Tie a Knot on a Maxi Dress
Source: https://medium.com/@learnmensfashion24/how-to-tie-a-tie-top-best-types-of-necktie-knots-bbb74e891660